Bulk create shared mailboxes with PowerShell #
To add a shared mailbox in Exchange Online, you can do this manually in Microsoft 365 Admin Centre. But it’s much faster to create multiple shared mailboxes and add users with access rights with a PowerShell script. In this article, you will learn how to bulk shared mailboxes in Exchange Online with PowerShell.
Connect to Exchange Online #
Before creating shared mailboxes in the next step, you must Install and Connect to Exchange Online PowerShell. Start Windows PowerShell as administrator and run the cmdlet below.
Connect-ExchangeOnlineCreate bulk shared mailboxes with PowerShell #
For this step, you must create a single CSV file to use in PowerShell as a source file. Initially, we want to keep it simple and start to create bulk shared mailboxes only.
Create a single CSV file #
First, you must create a CSV file in Microsoft Excel and save it as SharedMailboxes.csv in C:\temp.
You should use the following format for the CSV file:
- Name: Name of the shared mailbox
- PrimarySMTPaddress: Email address of the shared mailbox
Note: The Name and Primary address of the shared mailbox must be unique.
Check CSV file with Import-Csv cmdlet #
Run Windows PowerShell as administrator. Make sure that PowerShell can read the file and run Import-Csv cmdlet.
Import-Csv "C:\temp\SharedMailboxes.csv"This is how it looks in our example.
Name                     PrimarySMTPaddress
----                     ------------------
Design Team              Design1@exoip.com
Finance Team             Finance1@exoip.com
Marketing Team           Marketing1@exoip.com
HR department            HR1@exoip.com
IT Department            IT1@exoip.com
Security Department      Security1@exoip.com
Management Team          Management1@exoip.com
Sales Team               Sales1@exoip.com
Product Team             Production1@exoip.com
Research and Development RD1@exoip.com
Run PowerShell script to create bulk shared mailboxes in Exchange Online #
Run the PowerShell script below to create new shared mailboxes in Exchange Online in bulk.
# Import CSV file
$Datas = Import-Csv "C:\temp\SharedMailboxes.csv"

foreach ($Data in $Datas) {
    # Trim the Name property
    $MailboxName = $Data.Name.Trim()

    # Check if shared mailbox does not exist using -Filter
    $ExistingMailbox = Get-Mailbox -Filter "Name -eq '$MailboxName'" -ResultSize Unlimited -ErrorAction Stop

    if (-not $ExistingMailbox) {
        try {
            # Create shared mailbox
            $null = New-Mailbox -Name $MailboxName -PrimarySmtpAddress $Data.PrimarySMTPAddress -Shared -ErrorAction Stop
            Write-Host "Shared mailbox '$MailboxName' created successfully." -ForegroundColor Green
        }
        catch {
            Write-Host "Failed to process mailbox '$MailboxName': $_" -ForegroundColor Red
        }
    }
    else {
        Write-Host "Shared Mailbox '$MailboxName' already exists." -ForegroundColor Cyan
    }
}
Check shared mailboxes in Microsoft 365 Admin Centre #
You managed to create bulk shared mailboxes in PowerShell. You can also check which shared mailboxes you created in the Microsoft 365 admin center.
The outcome will look like the picture below.
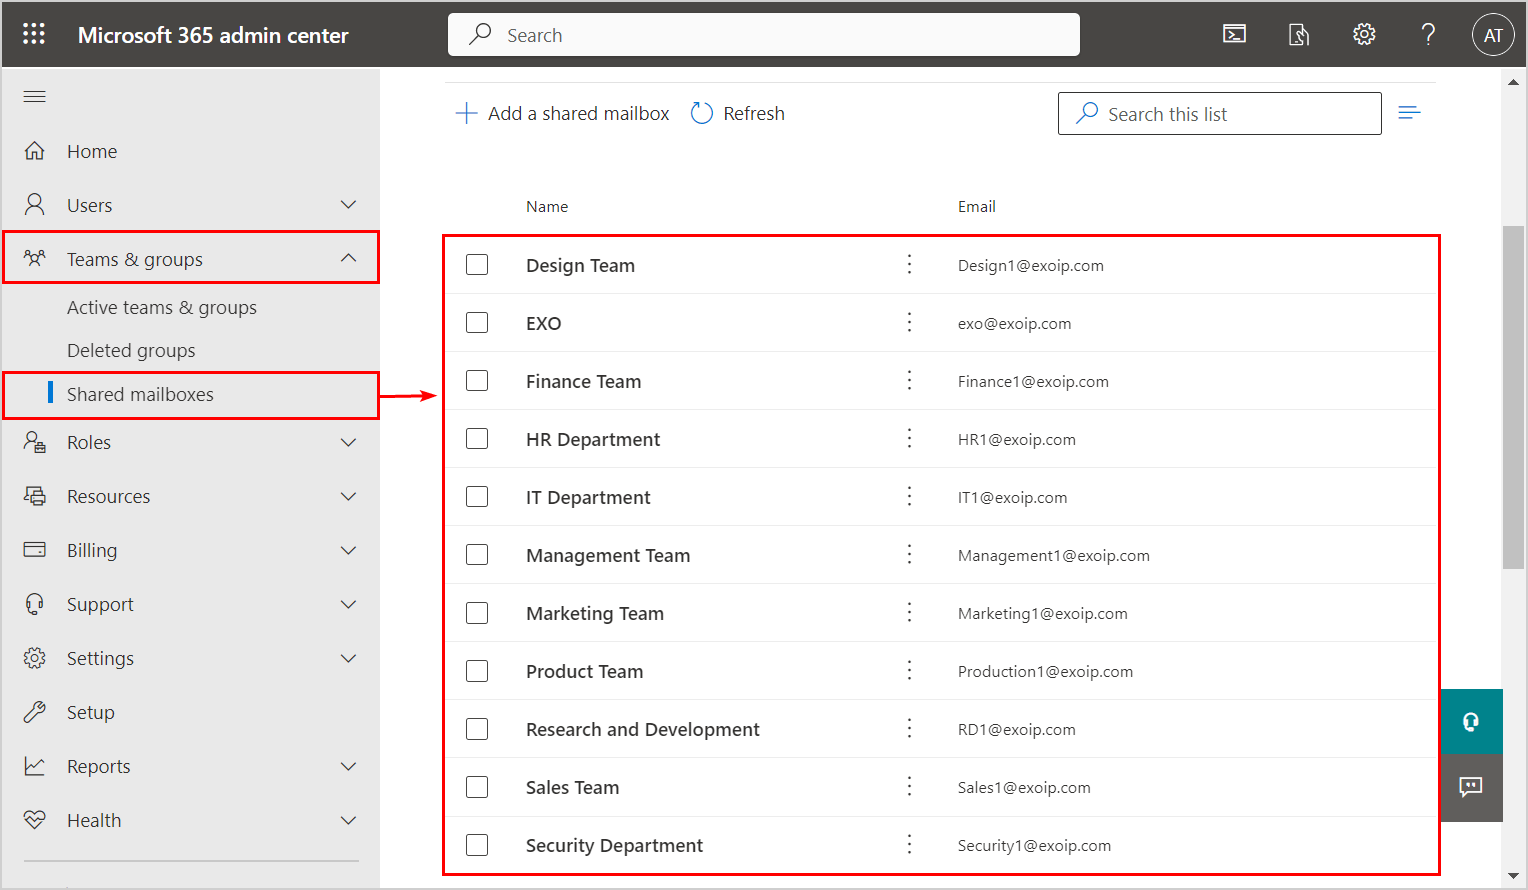
We have not assigned any users to these shared mailboxes. Look into the next step to add users with access rights to each of these shared mailboxes.
Create bulk shared mailboxes with user access rights in PowerShell #
For this step, you must create a CSV file with more data to use as a source file in PowerShell. You can add multiple users and assign them different permissions (Send As, Full Access, and Send on Behalf).
Create CSV to create bulk shared mailboxes with users #
You need to type the following data format in the CSV file:
- Name: Name of the shared mailbox
- PrimarySMTPaddress: Email address of the shared mailbox
- User: Active users (UPN)
- AccessRights: FullAccess, SendAs, SendOnBehalfOf
Save the CSV file as AccessRights.csv in your C:\temp folder. The CSV file will look like the example below.

Check CSV file with Import-Csv cmdlet #
Run Windows PowerShell as administrator. Make sure that PowerShell can read the file and run Import-Csv cmdlet.
Import-Csv "C:\temp\AccessRights.csv"This is how it looks in our example.
Name        DisplayName              User                      AccessRights
----        -----------              ----                      -----------
Finance1    Finance Team             Amanda.Morgan@exoip.com   FullAccess
Finance1    Finance Team             Stephen.Hunter@exoip.com  SendAs
Finance1    Finance Team             Carol.Baker@exoip.com     SendOnBehalfOf
Marketing1  Marketing Team           Ben.Hammond@exoip.com     FullAccess
Marketing1  Marketing Team           Craig.Hansen@exoip.com    SendOnBehalfOf
HR1         HR Department            Edward.Wilson@exoip.com   FullAccess
HR1         HR Department            Emma.Arnold@exoip.com     FullAccess
HR1         HR Department            Lisa.Philips@exoip.com    FullAccess
HR1         HR Department            Nick.Carlson@exoip.com    FullAccess
IT1         IT Department            Piers.Bower@exoip.com     SendAs
IT1         IT Department            Stephen.Hunter@exoip.com  SendAs
Security1   Security Department      Edward.Jones@exoip.com    FullAccess
Security1   Security Department      Jonathan.Fisher@exoip.com FullAccess
Management1 Management Team          Neil.Graham@exoip.com     SendAs
Management1 Management Team          Sarah.Coleman@exoip.com   SendOnBehalfOf
Management1 Management Team          Viola.Simon@exoip.com     SendOnBehalfOf
Design1     Design Team              Abigail.Hodges@exoip.com  FullAccess
Design1     Design Team              Wallace.Zheng@exoip.com   SendAs
Sales1      Sales Team               Amanda.Hansen@exoip.com   FullAccess
Sales1      Sales Team               Eddie.Lincoln@exoip.com   SendAs
Production1 Product Team             Kylie.Davidson@exoip.com  FullAccess
Production1 Product Team             Mary.Walsh@exoip.com      SendAs
RD1         Research and Development Curt.Berry@exoip.com      FullAccess
RD1         Research and Development Max.Gibson@exoip.com      SendOnBehalfOf
RD1         Research and Development Owen.Simpson@exoip.com    SendOnBehalfOf
Run PowerShell script to add access rights to shared mailboxes #
The PowerShell output lets you know if the shared mailbox already exists. If you have an incorrect user in your CSV file, the output will inform you that the user was not found. It will also not add an existing user twice to the same shared mailbox. You will get a warning that the user access rights are already present on this shared mailbox.
Run the PowerShell script below to add access rights to the existing shared mailboxes in Exchange Online.
Import CSV file #
$Datas = Import-Csv “C:\temp\AccessRights.csv”
foreach ($Data in $Datas) {
$Mailbox = $Data.PrimarySmtpAddress
# Check if shared mailbox exists using -Filter
$ExistingMailbox = Get-Mailbox -Filter "PrimarySmtpAddress -eq '$Mailbox'" -ResultSize Unlimited -ErrorAction SilentlyContinue

if ($ExistingMailbox) {
    # Mailbox exists, proceed with permission assignment
    $User = $Data.User

    # Add Full Access permissions
    if ($Data.AccessRights -eq "FullAccess") {
        try {
            $null = Add-MailboxPermission -Identity $Mailbox -User $User -AccessRights FullAccess -Confirm:$false -ErrorAction Stop
            Write-Host "Full Access granted for '$User' to '$($Data.Name)'" -ForegroundColor Green
        }
        catch {
            Write-Host "Error granting Full Access for '$User' to '$($Data.Name)': $_" -ForegroundColor Red
        }
    }

    # Add Send As permissions
    if ($Data.AccessRights -eq "SendAs") {
        try {
            $null = Add-RecipientPermission -Identity $Mailbox -Trustee $User -AccessRights SendAs -Confirm:$false -ErrorAction Stop
            Write-Host "Send As permission granted for '$User' on '$($Data.Name)'" -ForegroundColor Green
        }
        catch {
            Write-Host "Error granting Send As permission for '$User' on '$($Data.Name)': $_" -ForegroundColor Red
        }
    }

    # Add Send On Behalf Of permissions
    if ($Data.AccessRights -eq "SendOnBehalfOf") {
        try {
            $null = Set-Mailbox $Mailbox -GrantSendOnBehalfTo @{Add = $User } -Confirm:$false -ErrorAction Stop
            Write-Host "Send On Behalf permission granted for '$User' on '$($Data.Name)'" -ForegroundColor Green
        }
        catch {
            Write-Host "Error granting Send On Behalf permission for '$User' on '$($Data.Name)': $_" -ForegroundColor Red
        }
    }
}
else {
    Write-Host "Mailbox '$Mailbox' does not exist. Skipping permission assignment." -ForegroundColor Yellow
}
}
Check shared mailboxes with its users and permission in Microsoft 365 Admin Center #
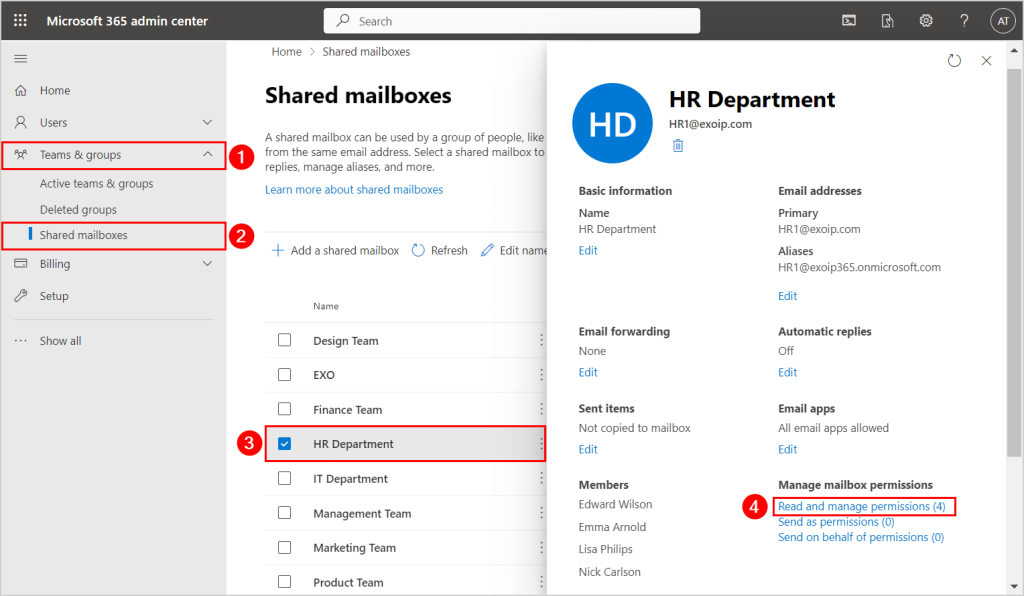
Verify the shared mailboxes in the Microsoft 365 admin center. If you click on each shared mailbox, you will see the number of users assigned and their permissions.
- Sign in to Microsoft 365 admin center
- Click Teams & groups > Shared mailboxes
- Click on a shared mailbox
- Click Read and manage permissions

Conclusion #
You learned how to create bulk shared mailboxes with a PowerShell script and a CSV file. It is the fastest way to import over a thousand users and assign their access rights to multiple shared mailboxes. The first PowerShell script allows you to create bulk shared mailboxes. The second PowerShell script adds multiple users with their access rights to each shared mailbox.